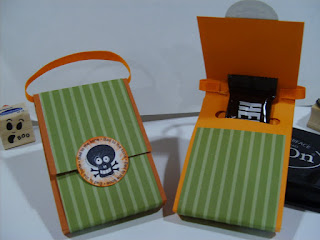
This is the last thing I've been putting together for Halloween. I saw them at Angie's great blog. You can view her tutorial here. Of course, her's are much fancier and mine were made last-minute to give to 12-yr-olds who will mostly care about what's inside. But you can see how they can be dressed up or down depending on your timeframe.
 The cardstock is 10" x 2.5" and scored at 2-3/16", 2-11/16", 6-1/8", 6-5/8". The pattern paper is 9" x 2-1/4". You adhere the pattern paper to the cs starting on the short end. And the use the word window punch on the part that is left sticking out.
Use four small pieces of sticky strip as shown in the photo below. The two pieces by the word window hold it together and the other two are to secure the ribbon.
For the closure, I used the 1-3/8" circle punch and stuck it on the top flap with sticky strip. The I used a tiny piece of sticky strip to close it. (Be sure to put the candy in first!) Angie uses velcro so it can be open/shut repeatedly.
And here is what my neighbor/friend/upline did with hers! She started with the same basic idea but switched things up a little. You can see more of hers on her blog http://heathersheavinlystampations.blogspot.com .
Happy Halloween!
Thanks for stopping by and have a good weekend. It's almost time for my "monsters" to head out.
.
Till next time, Tasha


1 comment:
Tasha,
I love these! I am glad you shared it with me so I could get so many Frankies done, and stay up till 3:30am doing it!
No seriously I really like them, and the patterned paper you made with the stamps!
Post a Comment