Showing posts with label card holder. Show all posts

Wednesday, May 6, 2009

Are You Showing Your Appreciation?

Hi Stampers! Today is Nurses' Day and Teacher Appreciation Day/Week so I have a couple of gift ideas to show you in the next few days. Both of these are upcoming classes and will be available as Quick Kits.

This wonderful gift idea came from fellow Stampin' Up! demonstrator Betty Traciak. Using her basic idea for a mix and match card set, I created the Choose A Card Gift Box Class.


This gift lets the recipient have a little fun by putting on the sentiments.

The class includes making the beautiful box, 6 coordinating gift cards, 12 scallop ovals, and 12 stamped ovals.

Details about the class and mail kits will be released at Saturday's Open House.


The next picture shows the dividers and the inside of the box. Note how I took the picture before the card was glued together and one of the dots slid off! But you get the idea.


Because the papere is the double-sided, the combinations are almost limitless and no 2 projects turn out exactly the same. Fun, huh?

I am loving using my new favorite Raspberry Tart designer series paper. Yes, I took advantage of this month's special!


I hope you have a great day and thanks for stopping by! Tasha


The Countdown Continues
  1. 3 days to the Open House
  2. 3 days to help at the flower shop
  3. 4 days to June's Cards of the Month sneak peek
  4. 12 days of school

Tuesday, April 7, 2009

Gift Idea

Hi Stampers! Today I want to share a 3-D item with you--a little purse I made for a friend's daughter who is turning 12. Not having planned ahead, I opted for a gift card and lip gloss from a store she likes. But I certainly couldn't send it "as is". Inspired by one of Lauren Meader's MyTimeless Templates, I put on my thinking cap and came up with this little purse which measures 5-1/2"x3-3/4"x1" when closed. Here is a close-up of the front closure.
And here is the purse! I hung the gift tag from the handle after taking the photo. The ribbon is easy to apply using sticky strip. The corner detail is made with Stampin' Up!'s new eyelet border punch (one of my current favorite items).

I chose cameo coral because I like how it looks with the cobalt blue holder that the gift card came in. I made a pocket to hold the gift card and matching greeting on the other side. I simply used Stampin' dimensionals to hold the lip gloss in place.

Here are the Stampin' Up! supplies I used in case you want to try one, too!

stamp sets: Eastern Blooms, Fundamental Phrases

cardstock: cameo coral, whisper white, brilliant blue

ink: brilliant blue, cameo coral, old olive, versa mark

accessories: old olive 5/8" grosgrain ribbon, green square jewel brads

tools: eyelet border punch, crop-a-dile

Have a terrific Tuesday and thanks for stopping by!

Tasha

PS I have another one I'll share tomorrow! I have had to wait for it to reach the recipient since I didn't want her to see it online first! ;)

Saturday, March 14, 2009

Card Holder Tutorial

Hi Stampers! Putting together a 3-d tutorial has been a challenge, especially since I still don't have any photo-editing software and lighting is always an issue. Anyway, I hope you can get through it enough to make some of these card holders/organizers. They are really quite easy and each section can go together in just a few minutes. Decorating time, of course, depends on you!!!

What you need:
1--12x12 piece up cardstock cut to 11"x12"
sticky strip or other very strong adhesive
Scor-Pal or cutter with a scoring blade


What you might want to add:
extra cardstock for base
designer pape
accessories
To start:


On the 12" side, score the cardstock at 6" and 10.5".


On the 11" side, score the cardstock at 4.5" and 6.5". Make a small mark 1/2" outside of your score line--at 4" and 7".


On the 12" sides, you will need to make a small mark 2-1/4" from your center score line. On one side that will be at 3-3/4" and the other side will be at 8-1/4". This is to get a diagonal cut line. Now line up your small marks on the cutter (see pic)


Cut both sides.


Next, on each 12 " side cut along the score lines in to the score line. Hmm...that's tricky to describe but you will end up with a cut along the 6" score and the 10.5" score. Hopefully the next picture will help.


The last score will be on the middle section of each 12" side. I think it is easiest to fold up the other flaps so you don't score them by mistake and then score it right in the middle which is 2-1/4" from the edge, see picture. It will also help assembly if you trim a little from the edge so it folds up well.


Now you are ready to assemble. **If you are going to decorate this by stamping, you need to have that done before assembling for best results.


Start by placing sticky strip on the center flaps as shown.


Fold up the front (short edge) as shown.


The center flaps will fold over this.


Now you will attach the sides. And you have to decide if you like them inside or outside. It will be more structurally sound if you put them inside. BUT, I like the cleaner look of having them outside. So try it out before you put any sticky strip on!!


This shows one side in.


This shows the same side on the outside.


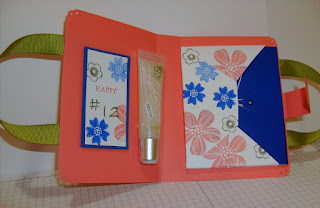
And here is the completed project. Check yesterday's post to see the double one with a base.


I hope you like this as much as I do!! I can't wait to make some for each month to store my Cards of the Month Club cards. Have a great weekend and thanks so much for stopping by!
Tasha


Thursday, March 12, 2009

The Countdown Continues

Hi Stampers! I am getting very excited for the April Cards of the Month Club release coming up this Sunday. But in the meantime, I'll tease you with something else. I stumbled across the coolest card holder yesterday and can't wait to show you!! I will post my version tomorrow and the tutorial might not be on till Saturday. Think mini-magazine holder. I think you will love it, too!
.
Thanks for stopping by! Tasha